Google is currently rolling out the February 2022 security update to Pixel devices, and here’s how to update to the latest version of Android. This update is available for Pixel 3a and later.
Updating to the November security update is easy. Unfortunately, Google hasn’t found a way to automate these updates, so some input from the user is required.
There are basically two ways to update your Google Pixel. We will cover each method, obviously the first method is the easiest, the second method is more difficult. The screenshots shown in this post are from the Pixel 4 XL, but they should look the same on any Pixel device.
How to update your Google Pixel via OTA (Over The Air)
This is by far the easiest way to update your Google Pixel smartphone.
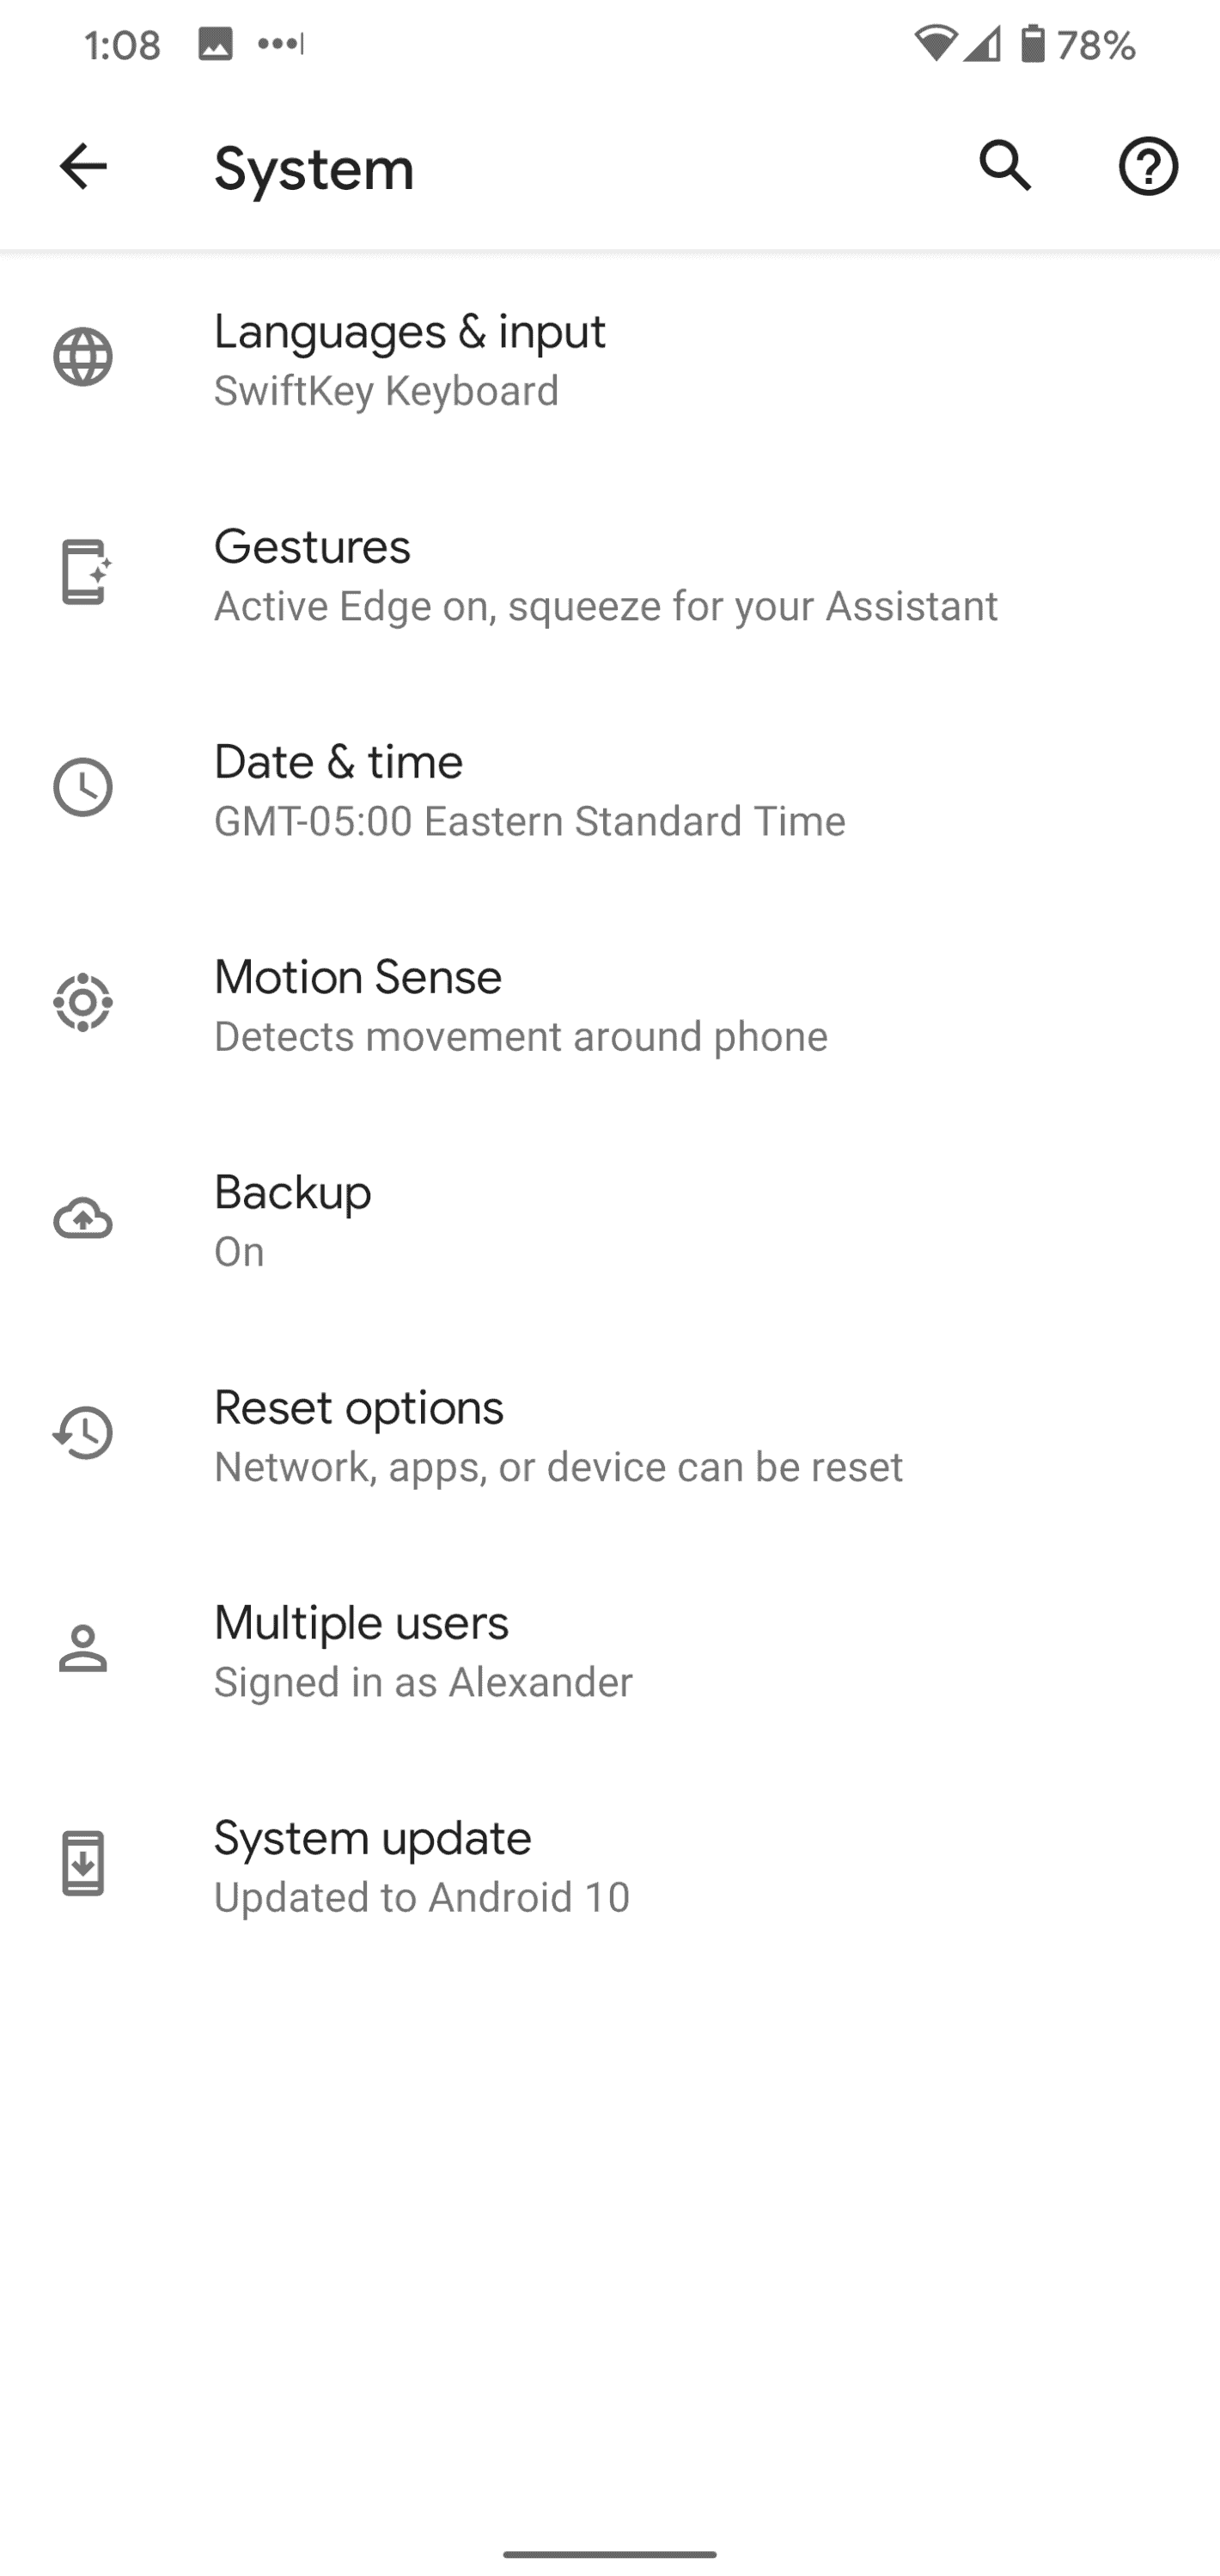
First, tap the settings icon in the app drawer or notification shade.
Now scroll down to System and click Advanced.

Then tap on System Update.
Now your Pixel is going to check for an update. It might not actually find one, depending on if it has been pushed to your device or not. You can also tap on the “Check for Update” button in the lower right-hand corner, to check again.
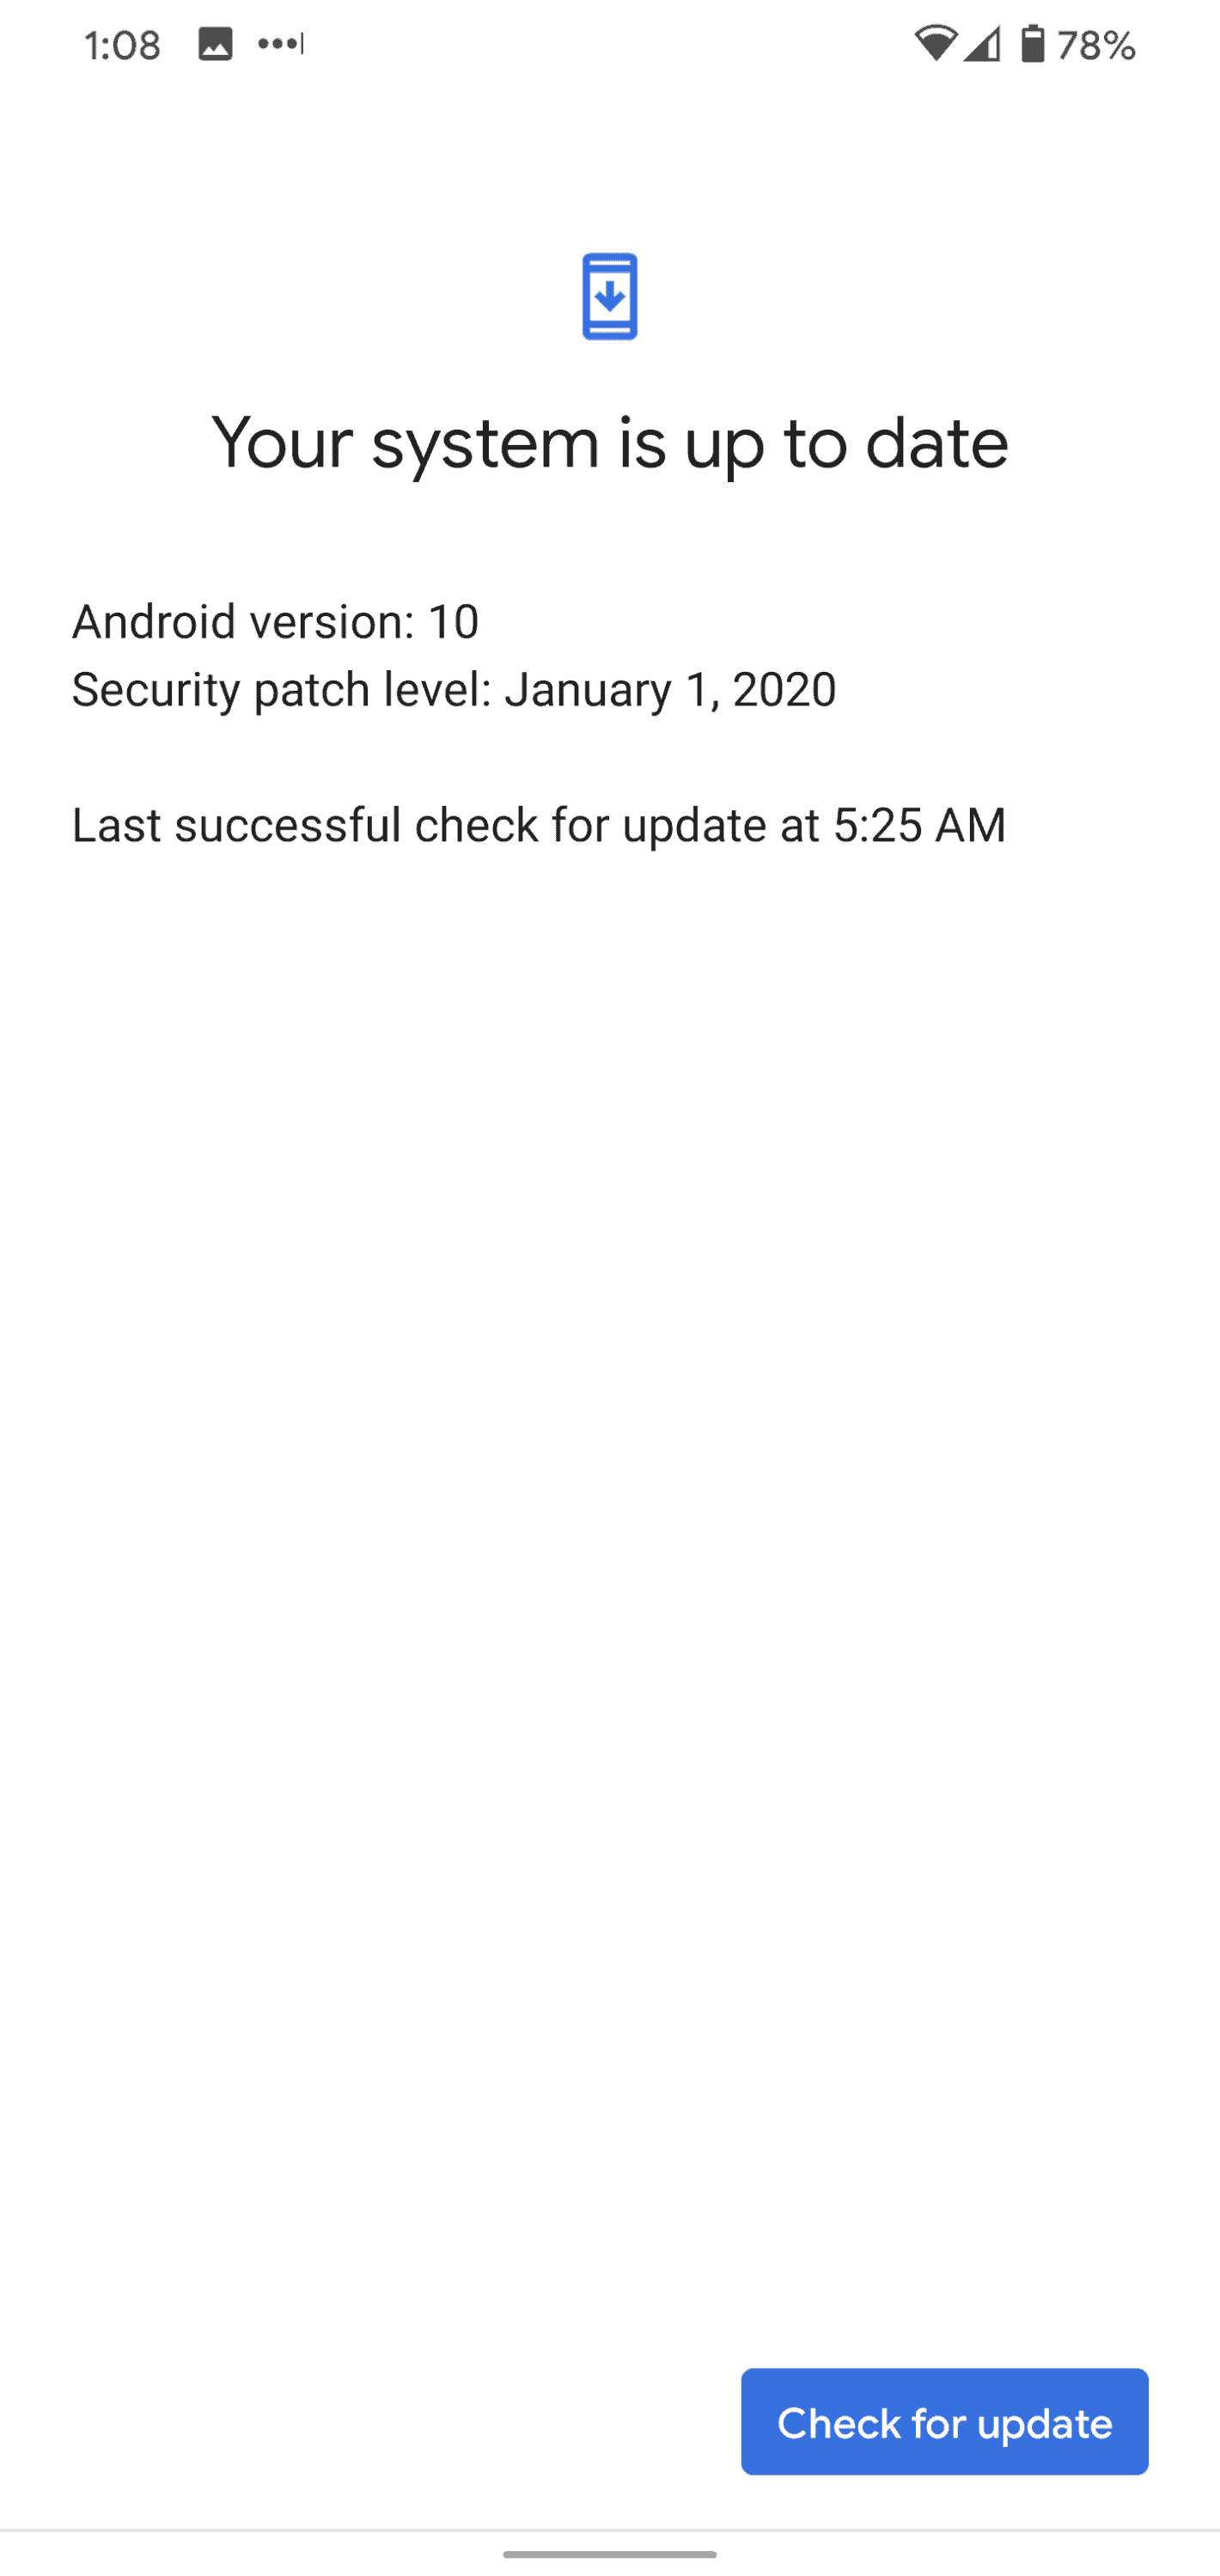
And that’s it. It’s just that simple to check for an update for your smartphone. If it does find an update, it’ll start downloading it in the background and prompt you once it’s ready to be installed
How to Sideload the OTA
This next method is a bit tougher, and has more steps. It should really only be used if your phone is for some reason, not getting the OTAs the regular way.
Basically, what you’re going to be doing here is taking the a zip of the files that were changed and pushing it over to your device to force the update. You’re going to want to pay close attention here, as there are many steps and if you do something wrong, it likely won’t work.
Firstly, you’re going to need to download the Android SDK from the Android Developer website.
Then you’ll want to open a command prompt or terminal (depending on your laptop or desktop’s OS) in the folder containing the platform tools.
Enable developer settings and USB debugging
Now that the SDK is installed. The next step is to enable developer settings and USB debugging, which will allow you to move onto the next step.
To do this, first go into Settings.
Then scroll down to System and tap on About Phone.
Next, tap on the Build Number seven times. Once you have tapped on it seven times, a dialog at the bottom of the screen will appear saying “you are now a developer”.
Press back, so you’re in the main settings page. Now you should see an option for Developer Options.
Go into Developer Options, and find USB Debugging.
Flip the switch for USB Debugging to on.
Now, plug your smartphone into your computer and click “OK” on the dialog box on your phone asking you to Allow USB Debugging while connected to that computer.
You can use the command adb devices in the command prompt or terminal to make sure that it is reading your device too. If it says “unauthorized” that means you need to give it permission still.
Unlocking the bootloader
Before you can do anything, you’re going to need to unlock the bootloader. That’s another big selling feature for a Pixel smartphone. The fact that you can easily unlock the bootloader.
To get started, you are going to need turn off your phone completely. Then press and hold the power button and volume down button. This will take you into the bootloader menu.
Alternatively, you can use command prompt to do this, type in adb reboot bootloader.
Now, to actually unlock the bootloader, you will need to use the command fastboot flashing unlock.
Moving back over to your phone, it will pop up with a dialog box asking if you are sure you want to unlock the bootloader. As it will factory reset your device. Use the volume buttons to highlight either yes or no, then use the power button to confirm it.
Once that is done, type in fastboot reboot-bootloader.
Flashing an OTA Update Image
Now, it’s finally time to flash that OTA. Of course, if you’ve done this before, you probably don’t need to worry about those last two steps.
And this also works without unlocking the bootloader. But to actually flash the entire factory image, you will need to unlock it.
In that command prompt or terminal window, type in adb devices to make sure that your device is connected.
Now, you’re going to put the device into bootloader mode. You can turn it off and then press and hold the power button and volume down button, or type adb reboot bootloader into the command prompt.
Now, you are going to use the volume down button and press it twice. Until you have scrolled down to the Recover Mode option. Then press power to select it. Once you do that, it’s going to look like your phone is restarting, then show an Android with a red exclamation mark over it. Now don’t freak out and think that your phone is dead, this is supposed to happen. Hold the power button and press volume up. Now you’ll be in recovery mode.
Being in Recovery Mode, you will not press the volume down button til you highlight the Apply Update From ADB option then press the power button to select it.
In command prompt, type in adb sideload [OTA file].zip as the command. You’ll change the [OTA file] to the name of the ota file. It’s usually easier to rename the file, so it’s not a random string of numbers and letters.
In Recovery Mode, it will show the status of the update being pushed to your phone. Depending on the size, it could take a few minutes before it is completely pushed. But once it is, the phone will reboot back to the regular Android screen.
And then you’re all set. You’ve successfully sideloaded an OTA to your Pixel smartphone.
That’s just how easy it is to update your Google Pixel smartphone to Android 12. Of course, this works for more than just the Android 11 update on your Pixel. But also for security patches and the quarterly feature drops that Google does.
Read more articles: https://www.facebook.com/RedTomElectronics/