As we all know, guys, to back up your iPhone is the good idea. Perhaps your phone is misbehaving and you hope to restore it to factory conditions and then apply the latest backup. Perhaps you’re upgrading to a new iPhone and want to transfer all your current data. Or you want to back up certain data or content for safekeeping. Whatever the reason, you can back up your phone and restore the backup if and when needed, a process you can perform on an iOS or iPadOS device.
One important issue: Cloud Storage or Local Backup?
There are pros and cons for each method. Using iTunes or Finder means you don’t have to rely on the cloud, though it also means you can restore the backup only from the Apple account on your computer. If your computer crashes, there goes your backup. The good news is that you can encrypt an iTunes or Finder backup if you want to back up your passwords, health information, and other sensitive data.
If you use iCloud instead, your backup won’t be affected by computer problems, is automatically encrypted, and is available anywhere. You can even back up to iCloud and restore the data from your phone itself, so you don’t need to go through iTunes or Finder. Unfortunately, if your backup uses too much data, you may need to upgrade to a paid iCloud account.

Apple doles out 5GB of iCloud space for free. The paid plans give you 50GB of storage for 99 cents a month, 200GB for $2.99 a month, or 2TB for $9.99 a month. For example, my 512GB iPhone 12 with around 190GB of data required more than 20GB of space on iCloud for its backup, so I needed the 50GB storage plan just to get started.
Google One is another cloud storage option, but it comes with some limitations for iPhone users. You can only back up your contacts, calendar, photos, and videos. Your apps, settings, and other items won’t be included. There is also no direct way to restore this data through the Google One app on your iPhone. Google One is available for free with 15GB of space or as a paid subscription with 100GB to 30TB of storage.
Back Up and Restore Data With iTunes
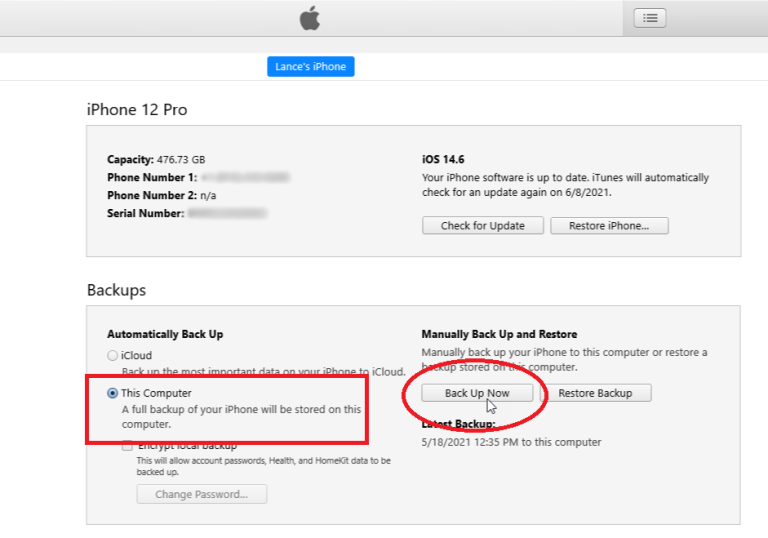
Firstly, just connect the phone to your computer and fire up iTunes. Click the icon for your phone, then make sure the option for This Computer is selected in the Backups section. Click the Back Up Now button. iTunes syncs and backs up your phone to your computer. After the backup completes, the timestamp under Latest Backup indicates the latest backup date and time.
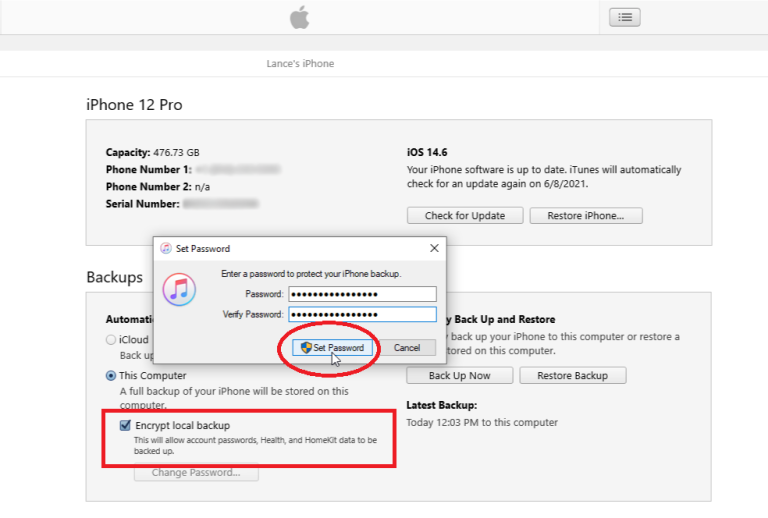
Provided you just wanna back up passwords, Wi-Fi settings, website history, and health data, you’ll need to encrypt the backup. Check the box next to Encrypt local backup. Enter and then re-enter a password and click Set Password. With Encryption enabled, iTunes should immediately start backing up your phone. If not, click Back Up Now.
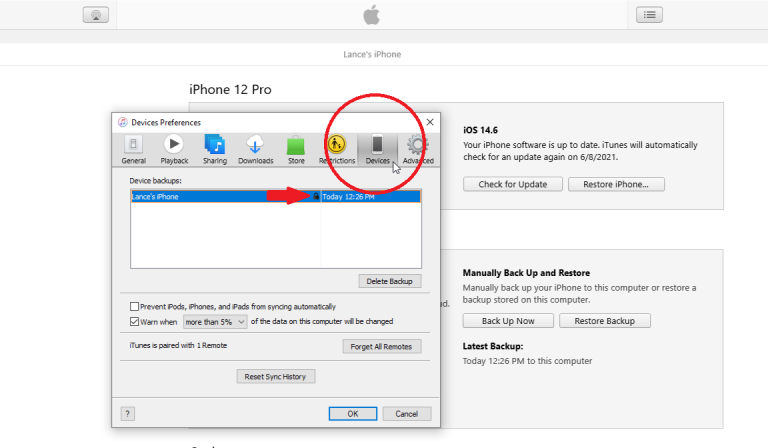
After the backup is finished, you could confirm that it was encrypted. Click Edit > Preferences in the program’s top menu. In the Devices Preferences window, click the Devices tab. A lock icon next to a backup indicates that it was encrypted. As long as you keep the encryption option enabled, all future backups will be encrypted. To stop encrypted backups, uncheck the box next to Encrypt local backup and confirm your encryption password.
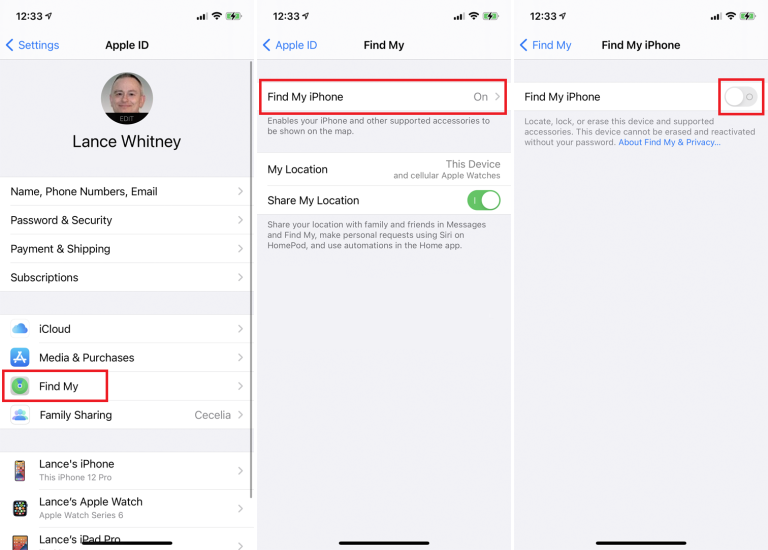
And, now let’s say you need to restore your iTunes backup, either to the same phone or to a new phone. Before you can restore a backup to an iPhone, you need to disable the Find My iPhone feature. On your phone, go to Settings > [Your name] > Find My > Find My iPhone. Toggle Find My iPhone to off, type your password, and tap Turn Off.
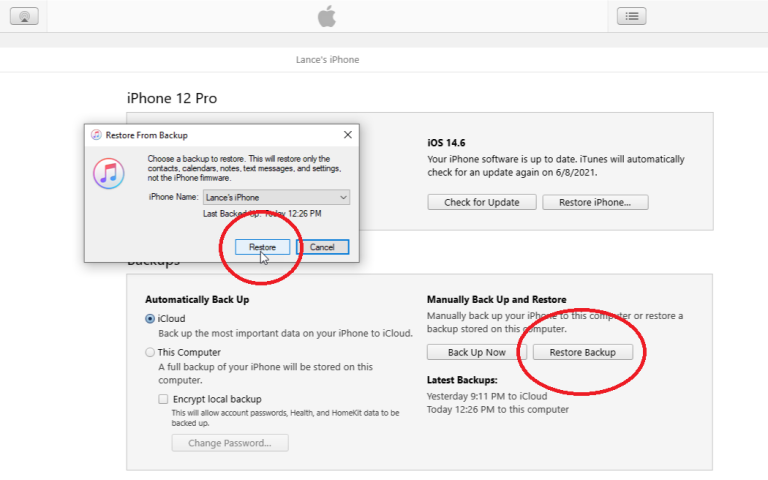
With Find My turned off, connect the phone to your PC. Click Restore Backup. Make sure the correct backup is selected by the date and time. If not, click the drop-down menu and select the backup you want to restore. Click Restore. Type the encryption password if the backup was encrypted. iTunes starts restoring your phone.
Sign into your phone when prompted. After the restoration finishes, sign in again. You may need to wait for all your apps to be updated and accessible. Then browse your phone’s home screens to make sure all the apps and information are intact.
Back Up and Restore Data With iCloud
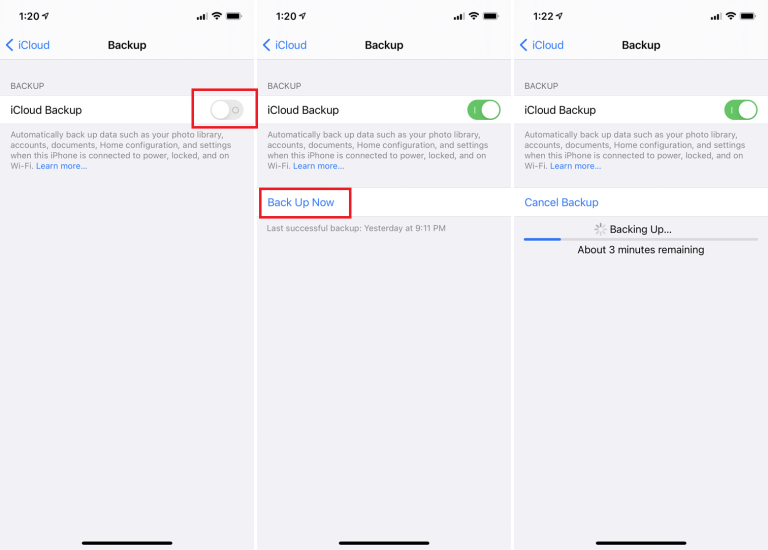
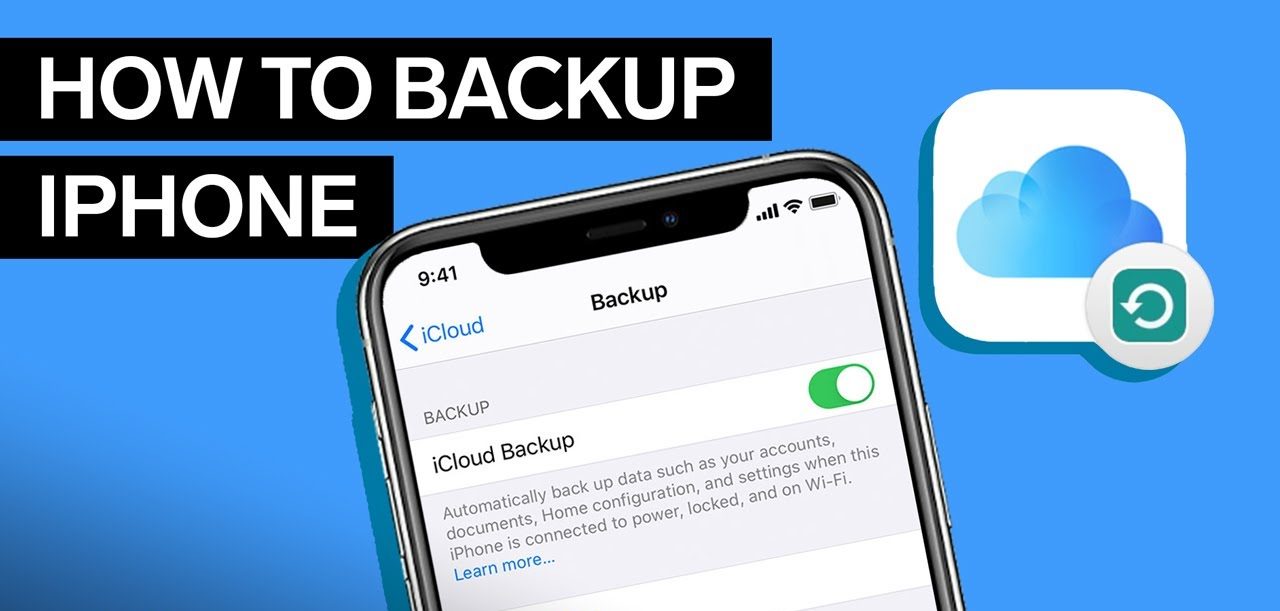
Back up your phone’s data directly from your iPhone by using iCloud. Open Settings > [Your name] > iCloud > iCloud Backup on your iPhone. Turn on the switch for iCloud Backup and tap the Back Up Now button that appears. Your phone is then backed up to iCloud. After the backup completes, return to the previous screen to see how much iCloud space the backup ate up.
After you turn on iCloud Backup, a backup automatically runs every 24 hours after the last successful backup. For this to occur, your phone must be turned on and connected to the internet through Wi-Fi. It must also be connected to a power source, and your screen has to be locked or turned off.
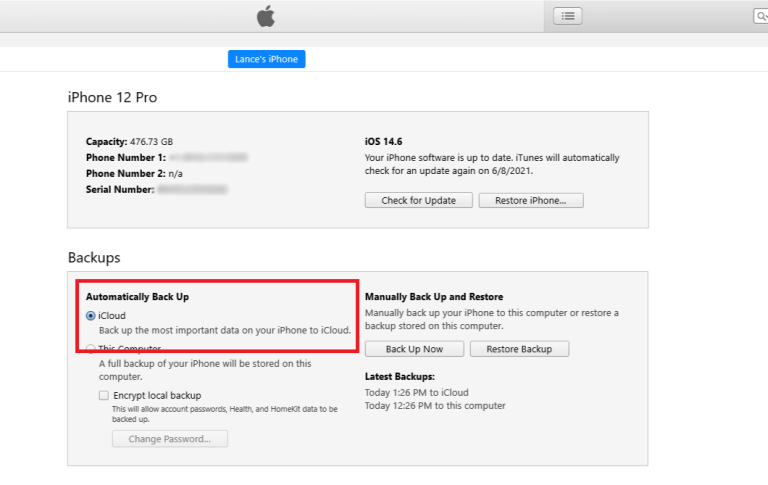
If you connect the phone back to iTunes or Finder on your computer, you’ll notice that the option under Automatically Back Up is now set to iCloud.

In order to restore your iPhone from the iCloud backup, go to Settings > General > Reset on your device. Tap Erase All Content and Settings. You’re then asked if you want to update your iCloud Backup before erasing. If you need to create a new backup, tap Backup Then Erase. If you know you have a recent backup, tap Erase Now instead.
If you just wanna delete all the things, you would just need to enter your passcode. Then tap Erase iPhone twice. The device gives you ample warning that this will delete all media and data and reset all settings to ensure that you don’t do this accidentally.
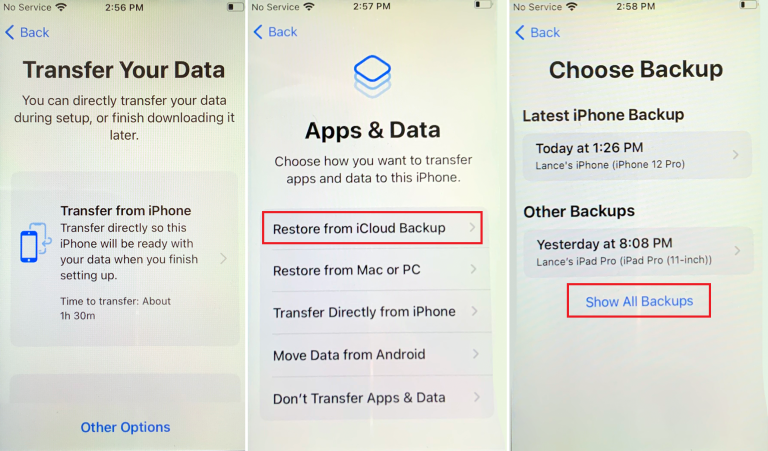
After your data has been backed up, you can restore it in the event of a problem or use it to set up a new phone. Follow the screens to set up the phone either manually or automatically through another iOS device. At the Apps & Data screen, choose Restore from iCloud Backup and then sign into iCloud with your Apple ID and password. At the Choose Backup screen, tap the backup you want to restore.
Provided you don’t see it, tap the Show All Backups link and select one from the list. Next, choose the settings you want to restore. Your iPhone is restored from the backup and restarted. Sign in and wait for your apps to be installed and updated.