
Here are 18 skills that you must learn for mobile phone photography! Learn all of them and you will be a mobile phone photography master!
1)Start from simple and decide on a clear theme for your photos!
To create an artistic conception in a photoshoot, it is better to start with a simple story and determine a theme that you want to express. Like just taking a reflection on the water, a clear day with a blue sky, or a kid in front of a cake shop. Photos that are too complex or have too many elements can make it harder to understand the meaning behind them.

2)Use good light
Most phones don’t capture enough light as a camera does, and they’re often too dark. Make sure the light around your subject is adequate, whether that means moving your subject to a well-lit area, or using the phone’s brightness, night mode, etc., that it’s bright enough to look good. Besides, light from the side accentuates the texture of an object to be better, so use side light when possible.

3)Steady!Steady!Steady!!
People who love taking pictures with their cell phones may know this. Many people think that “the right hand is powerful, I use my right hand to grasp well and then it will be stable” and some people think that “the two hands are more powerful, two hands together to hold more stable” in fact, these two kinds of holding method are wrong! Hold the camera with your left hand, not your right hand. Point the camera at the subject with your left hand while shooting, then hold your left hand with your right hand and keep it steady. Set the shutter sound and remind yourself to hold your phone steady until the picture is finished!

4)Avoid unnecessary flash
Don’t let your mobile phone’s flash ruin the natural light effect. Most mobile phones have a flash, but when you use flash directly on your subject, the picture will lack stereo pods and large shadows will appear behind the subject, which is very ugly. When it comes to your eyes, there will be red eyes. So, don’t use flash if you can. The night mode is better than the flash.
5)Get close to your subject
Most camera phones don’t have a zoom lens, so when you’re shooting, don’t look too far away from your subject. Try to fill the lens with your subject, which will make the picture appear clearer. Approach your subject until you can show as much detail as possible. For some close-up shots, close up can also create a better background blur effect!
[wpsm_ads1]
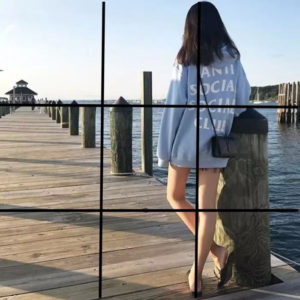
6)Use the trisection method of composition
If the subject is right, what is the best place to put it in the lens? The adoption of the “trisection method” composition means that the main subject and the center are slightly staggered in the actual photographic composition, and the echo between the subject and other objects is paid attention to.
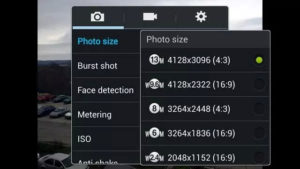
7)Adjust the impact quality when taking photos
Many camera phones come with the ability to select photo sizes, usually with low, medium, or high accuracy. The higher the accuracy, the clearer the picture will be. Remember to set your phone to maximum accuracy to get a high-quality image. You may not be able to tell the difference in accuracy from the lens, but the results will be very different on the computer!
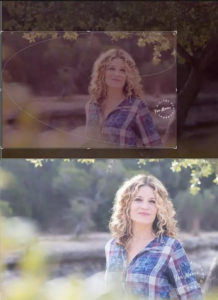
8)Choose a good photo APP
Choose a good App that can instantly make up for imperfect camera technology. If you want a good shot rather than a colorful, flashy drawing, use fewer filters and try some professional video editing tools to fine-tune contrast, sharpness, color temperature, etc.

9)Focus correctly and don’t use the digital zoom!
Unless you’re deliberately trying to get a hazy picture, make sure that the focus is right before you press the shutter. Many phones also have a digital Zoom feature, which allows you to Zoom In on distant objects, but the image quality is terrible. Instead of using the phone’s digital zoom feature, you should wait until you’re done and then use the editing feature to cut out the desired part.
10)Keep your photos simple
Many photographers make their photos look complicated at the beginning, which tends to lose the appeal of the photos. So when we shoot, we can try to shoot only one subject or one point of interest, so that our photos can serve as a foil. If the background blank technique is also a good choice. And we found that the more concise photos were also the ones that were shared more on social media. So simple photos can let the reader at a glance, gladly accept.

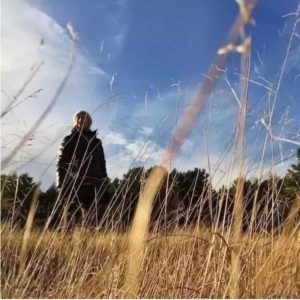
11)Shoot your photos from a low angle
Low Angle shooting, we’ve talked about this a couple of times, because the advantage of low Angle shooting is that you can see things from a whole new perspective. And his ideas will be even better. It can avoid interfering with the theme of the picture and highlight the perspective. For example, when we shoot the reflection of water at a low Angle, we can show more interesting details.
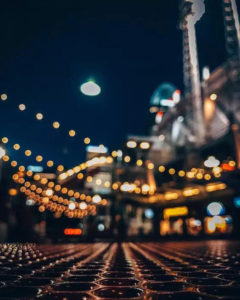
12)Create a sense of depth in your photos.
The way that makes most photos look better is that we find some lines to create a sense of life because it helps draw the viewer’s eyes to the scene. This technique is most common when photographing landscapes. The roads, paths, railway tracks, rivers, fences, ripples in the sand, or the water at the edge of the beach, are all easy to photograph well and have depth.

13)Mke your photos echo each other by creating a diagonal composition
If you have more than one theme in your scene, try to align diagonally within the frame. This usually makes for a more balanced and harmonious combination. So when taking these shots, take some time to move the main elements around so that the image is symmetrical and balanced.

14)Capture close-up details of the object
One of the biggest mistakes beginners make when taking photos is not getting close enough to the subject. If you shoot too far away, you’ll never capture the amazing details, colors, and textures that really bring a photo to life. This is especially important when shooting objects with complex details such as flowers, leaves, water droplets, and textured themes. However, if the camera is too close to the subject, our phone may not be able to focus. If you want to capture extreme close-ups of detail, you need to use additional macro lenses that allow you to get very close to the subject.

15)Look for shadows in your work as objects for composition
When the sun comes up or goes down, the long shadows created by the picture are often very interesting. Shooting shadows can add a wonderful sense of mystery to your images. Shadows can create stunning abstract images, so we should pay attention to the interesting shadow patterns created by objects such as railings, trees, and other objects in our daily life.

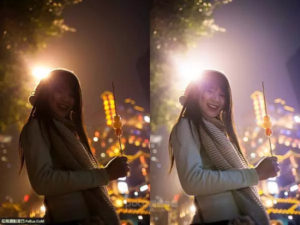
16)Take silhouette photos
To get an incredible silhouette shot, all we have to do is to find an interesting topic (like a person) and shoot towards the light source. To make sure your silhouette looks dark enough, click Set Focus, then swipe down to reduce the exposure. Of course, you can always darken the silhouette by using the editing application.

17)Use the water surface and mirror reflection to take photos
We can find reflections on many different surfaces, including glass, shiny cars, and ice — but water is probably the best surface for reflection photography.

18)Use cemetery to compose
In photography, the term Symmetry describes the fact that half of the image is identical (or nearly identical). Reflection provides a simple way to create symmetrical images. But, of course, reflection is just one way of creating symmetrical combinations. Buildings and other man-made objects (buildings and benches in the picture below) are often designed to be symmetrical.